A good excuse to show off their warm woollies
Click to enlarge
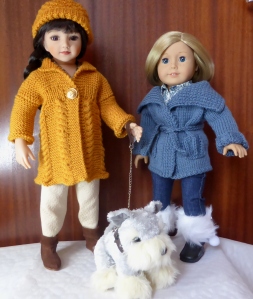
It’s a chilly March day here in Wiltshire and Kit and Maru are setting off to walk their dog, Herr Flick the German Schnauzer. Winter and early Spring are knitting season at Kit’s Couture, and they both have new woolly jackets to show you.
Daybreak to Dusk coat
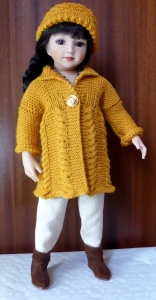
Maru could wear this anytime – from Daybreak to Dusk
Maru is wearing this lovely coat for 18-20″ dolls from a pattern by Knitting Nanny Mo, available from My Doll Best Friend. This is an unusual and stylish pattern for a cabled coat. The ribbing drawing it in slightly below the yoke makes it fit nicely to Maru’s torso, and the bodice sits well on her sloping shoulders. The cabling on the skirts of the coat decorate without overwhelming and the gently ruffled hem is a pretty touch. A single statement button fastens the bodice together. With her outfit, Maru wears last year’s Whidbey watch cap, and her favourite suede ankle-boots.
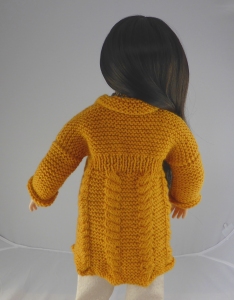
Just as pretty from the back
Click to enlarge
This was quite an easy pattern to knit up. I used shade 140 ‘Gold’ of my favourite Jarol Heritage DK yarn, a colour which looks so much better in real life than it does in my photographs. I followed the pattern exactly apart from row 4 of the cable pattern on the right front, where I felt the cables were the wrong way round. I wanted them to be a mirror image of the cabling on the left front, so I adjusted the instructions for row 4 to: K6, C6F, K6, C6B, K6. This seems to me to work better – certainly I prefer it.
Apart from this small tweak the pattern is perfect, and I do love the design. I’m busy now knitting it in Aran yarn on size 7 needles, making a larger version to fit my 24″ Paola Reina Las Reinas girl Lidia.
Spring Fever big collar cardi
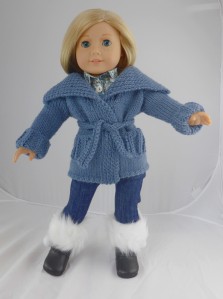
Spring Fever – just right with jeans
Click to enlarge
Kit’s new jacket is Spring Fever, a Jacknitss Design for 18-19″ dolls by Jacqueline Gibb. I chose Jarol Heritage DK shade 146 ‘Ming’, a dusty blue, to flatter Kit’s summer colouring and also tone perfectly with her button-up shirt. This gorgeous jacket has a twisted ribbed bands which extend up and join the huge collar which does duty as a shawl or cape to keep Kit’s shoulders snug and warm when the March winds blow. The wide ribbing on the deep cuffs is echoed by the same ribbing on the two pockets, and the tie belt is worked as twisted rib to match the bands and collar. Kit completes her outfit with a pair of fur-topped black boots with crazy pompom decorations.
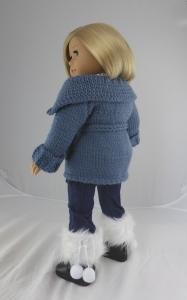
Collar – or shawl in disguise?
Click to enlarge
This was such a good pattern, so easy to follow and there was nothing that I needed to adjust or change. It knit up perfectly to size and the fit was excellent. In fact, it was so good that it encouraged me to try another Jacknitss pattern…
Delightful Duffel Coat
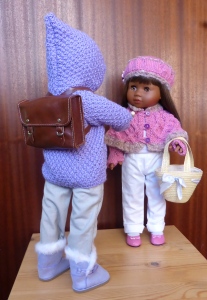
Who’s this little pixie talking to Jamila?
Click to enlarge
Our mystery model is wearing a gorgeously-textured hooded coat with the grey trousers from Kidz ‘n’ Cat’s Sophie’s ‘meet’ outfit, and matching mauve boots with fur tops. She’s carrying all she needs for her outing on her back in her smart leather satchel.
Meanwhile Jamila is wearing last year’s Pemberton Capelet and hat that she has inherited from Shona – and they fit her beautifully. Her white trousers are from Precious Day Elisabeth’s ‘meet’ outfit and she has Kidz ‘n’ Cats shoes on her feet.
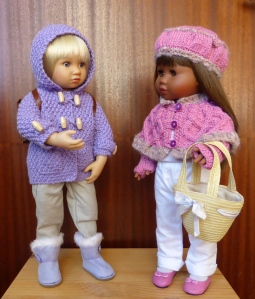
It’s Helen in a hoodie!
Click to enlarge
And the mystery model turns out to be Kidz ‘n’ Cats Helen, with her hair tucked inside her new soft mauve duffel coat, knitted in Jarol Heritage DK shade 107 ‘Lilac’. This is the coat from the Duffel Coat Set for Kidz ‘n’ Cats (18″ slim dolls), our second Jacknitss design. Besides this attractive coat, the Duffel Coat Set also includes instructions for a yoked top, skinny leggings and even a duffel bag. I have only made the coat so far.
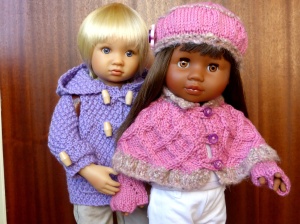
Hood down for a portrait shot with Jamila
Click to enlarge
This is a faultless pattern which knit up perfectly. The instructions for the coat are very clear and detailed – just what I like. A completely new technique for me was the 3-needle bind-off (cast-off) to join the shoulder seams together, far less bulky than a stitched seam and ideal for doll’s knits. I really like this design with its double moss-stitch texture, cuff straps, frog fastenings and its little toggle buttons.
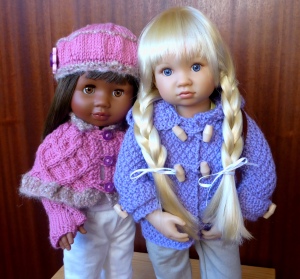
Helen to the fore!
Click to enlarge
A quick hair restyle into two plaits, and Helen’s happily in front of the camera again, showing off the toggle features and luscious texture on her new coat.
These three attractive and very different coat patterns have all been very successful, and have certainly helped me while away some dark and cold winter evenings. But very soon it will be time to get the sewing machine and the cotton fabric out because spring is just around the corner – can’t wait!