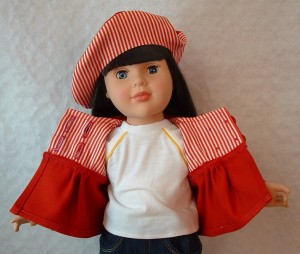
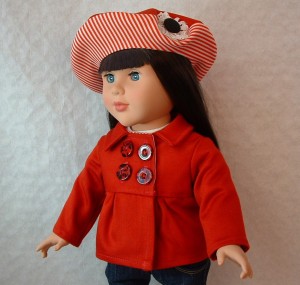
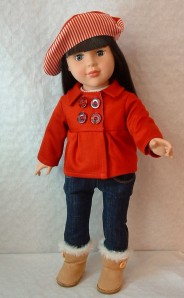
Spring is definitely here, but it’s not always as warm as we might expect for the time of year. Today Shona is prepared for any cool Spring breezes in her Empire-line peacoat with a matching beret.
(As with all photos on this site, you can click on any one to view a full-size image)
The peacoat pattern comes from Heritage Doll Fashions and is available from Liberty Jane’s Pixie Faire pattern shop. It is sized for American Girl, so fits similar-sized dolls like Gotz Precious Day and Madame Alexander Favorite Friends like Shona. I’ve made it up in a glowing wine-red which my camera insists on seeing as a dark orangey-red. The material was provided by my friend Helen who kindly raided her stash for me when I visited her in Edinburgh last summer. It is quite a substantial material, rather inclined to fray, which certainly added a complication I hadn’t expected. I half-lined the jacket with a stripy poplin, and picked some striking buttons as they are such a strong design feature. To complete the outfit I introduced some French chic with a beret made using Vanina’s tutorial.
The Peacoat
As always with Liberty Jane patterns, the Empire Peacoat pattern comes with a very clear instruction book. The front cover optimistically describes it as ‘Easy and fun to sew!’ but the website rates it ‘Intermediate’ which is much more realistic. This is quite a fiddly little jacket to make up.
The first challenge was setting in the collar between the jacket yoke and yoke lining. I had to stitch through three layers of substantial jacket material plus one lining layer, with all three jacket/collar layers fraying like mad. After this experience I bought myself a bottle of Fray Check and treated the edges of the jacket pieces as well as zig-zag neatening them in the usual way.
The sleeves were set in next. Again, bulky, fraying seams were the main problem, but I knew what to expect and all was well. Then the jacket skirt had to be gathered at the front and stitched to the yoke and lining. The last step was to top-stitch around the edges of the jacket yoke and under the collar. So far so good. It looked great!
But then came the bit I was really worrying about as it had the potential to sabotage all my work so far. I had to attach four buttons and make four button-holes. The buttons and button-holes had to line up perfectly, they had to be placed so that they were properly centred on the jacket overlap. I started with the button-holes and puzzled for some time about how I could ensure they were both vertically and horizontally aligned. I got out the button-hole foot and reminded myself how it worked (it usually takes me by surprise) and tried out a few experimental button-holes on spare fabric. Then I looked at the jacket front and experimented with marking the tops and bottoms of the button-holes with pins. That didn’t work so well. Finally I tacked in vertical markers to show exactly where the button-holes had to go, with horizontal tacks marking their top and bottom edges. Then I stitched the four button-holes and to my relief they were amazingly successful! After that it was relatively easy to sew on the buttons in the right positions and the jacket was finally finished. What a relief!
The Beret
Now on to the beret. This meant I had to grapple with some maths that I’d not had to worry about since I was at Grammar school (that dates me!). Luckily Vanina spells it out for us (in French…) and here’s my English translation of what she says to do to make a beret to fit any sized doll. You’ll need some paper and a pair of compasses (back to school again). Do look at Vanina’s method as her illustrations are very helpful even if you can’t read French.
- Measure around the doll’s head in centimetres. Divide this number by 6.28. This will give you the radius of the circle you need to draw to fit your doll’s head. Shona’s head measures 30.5 cm. So my calculation was 30.5 ÷ 6.28 = 4.85 cm. So I set my compasses to just under 5 cm and drew my first circle on the paper.
- Now reset the compasses to double the radius setting and draw a second circle using the same centre point. I reset mine to 9.7 cm.
- Finally reduce the original compass radius setting by 5 mm and draw another circle inside the first one, using the same centre point. This is your seam allowance (approx ¼”).
- Now you can cut out your pattern, taking care to cut out the centre following the third circle you drew, thus preserving your seam allowance. You end up with a pattern looking like a ring doughnut.
- Using the pattern on your main material doubled, cut out a complete circle (but do not cut out the centre). This will be the top of the beret and its lining.
- Then using your contrast material doubled, cut out a complete circle and this time also cut out the centre. This will be the underside of the beret and its lining, incorporating the hole which fits over the doll’s head.
- Take the two underside pieces, right sides together, and stitch around the inner hole. Clip the curved seam, turn right-side out and iron. (Look at Vanina’s instructions point 4)
- Take the two top pieces, wrong sides together. Place the bottom piece exactly on top and stitch completely around the outer edge 5 mm from the edge. Overcast or zig-zag the raw edges together. (Look at Vanina’s instructions point 5)
- Turn the beret inside-out so that the seam is hidden inside, and decorate with a flourish of your own devising. (Look at Vanina’s instructions point 6).
To decorate Shona’s beret I used some broderie anglaise lace ruffled around a black button. Quite by coincidence, this looks rather Scottish, which is nice given that the jacket material came from Edinburgh.
This was quite a challenging project, made more tricky by my choice of rather temperamental material. The results are worth it, though, and Shona is very pleased with her very stylish emsemble, which she has teamed with her Liberty Jane jeans and some gorgeous Ewe boots from our favourite doll shop.
Here she is all ready to go out. She’s just off to the bluebell woods to appreciate one of the finest sights of an English spring.


